|
Home Updates Hydros Cars Engines Contacts Links Next→ Aircar article Contact On The Wire |
|
|
Steve Betney's Work Bench |
BASIL MILES' 1948 MG TROPHY WINNER REPLICA
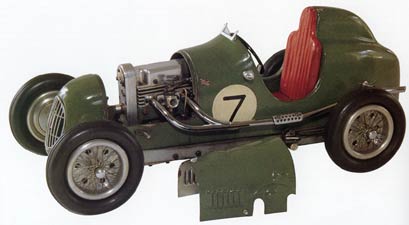
Having been addicted to using ED model engines for the last 55 years and collecting them for some 35 years or so I gradually became more interested in the work of their early designer, Basil Miles. Hardly any two of the engines made by his hands, the 0.9, 3.5, 5, 8, 10 & 15cc as well as larger types, were exactly the same, even if differing only in points of detail. I was delighted to acquire an original ED Aerocar tethered car designed by him on eBay about 8 years or so ago now. The vendor turned out to be Bill Langley, who had acquired it for the princely sum of £1 from no less a person than the famous Gerry Buck, who had owned it from new. Over the years it had been well used and re-engined a number of times, witnessed by the many drilled holes and bits added to the bearers, and at that time had a tired Mills 1.3cc fitted. Cosmetically it was in fairly lamentable condition, with a very thick coat of purplish, creosote-like paint. A full strip-down revealed that the only new parts needed were some good straight ½" square beech chassis members to replace the original gnarled and twisted items, a new pair of beech engine bearers, a new brass strip for the bonnet joint and some replacement 4BA 5/16" square nuts where they were missing or corroded. The original green and red cellulose finish was visible during the strip-down, so matching cellulose paint was procured for the renovation, and a decent and more appropriate ED 2cc Pennyslot diesel engine with a white plastic ED propeller fitted.
|
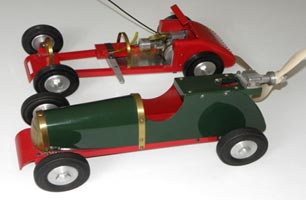
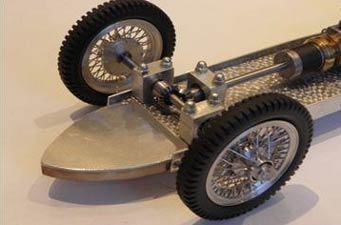
This is a picture of my restored Aerocar, alongside my Spur Gear car under construction. A certain R T Pole has been requesting preparation of some construction drawings from this original Aerocar so that RRC members who wish can build accurate replicas, so hopefully these can be completed for publication in a later Newsletter. After joining the Retro Racing Club some years ago, with a long interest in tethered cars and having built a couple of Oliver cars from Ivan Prior castings and parts back in the 1990s, I acquired sets of Model Cars and Model Car News magazines from my old friend Mike Beach (which turned out to be Ken Procter’s own original copies). |
|
|
|
On the back page of the July 1948 MCN is a nice advertisement for the new ED 2.49cc front rotary diesel (the early plain crankshaft bearing version with the non-scalloped cylinder head top fin), with a much retouched photo of Basil Miles’ spur geared car which won the 1948 MG Trophy with this engine at 41.7mph (see image left). Much further delving into the April/May 1948 issues of Model Cars magazine turned up a couple of further images and some outline information on this car and the earlier "Flatiron" prototype from which it was developed, and also his later 1949 streamlined MG Trophy car (said to look somewhat like a 1947/8 Gerald Spink 500cc Squanderbug full size car) in the July 1949 issue. |
There is a text-only announcement of an upcoming kit of parts to build this spur geared car on a late 1948 ED price list, but none of my ED collector friends have ever seen an example or plans of it, or know of the existence of these anywhere, so perhaps this listing was jumping the gun and it never really made it into production (for reasons I shall give my suspicions about later….). An ED advertisement in the June 1949 MCN magazine mentions the Series 2 version of the 2.49cc Mk3 diesel, by now with the scalloped top cylinder fin and with a needle roller bearing crankshaft, and possibly this was the version that won the Hastings Trophy and set a new Class C record of 50.5mph. This advertisement also lists "ED Spur Wheels" of 40DP and 1.5:1 ratio at 25/- per set. Since a single ED wheel was 6/6d, presumably this "Spur Wheel" must have been a back axle fitted with 2 driven wheels and a set of spur gears? Needless to say, the images of the car in MCN and MC magazines, plus its resemblance to a 1930s Alfa Romeo Monza Spider or an Aston Martin Ulster (with the back ends squared off) whet my appetite to make one of these cars, so with a plan or kit being unobtanium (a rare element) I set about designing a replica as exact in every detail as possible.
This only proved feasible because the original Aerocar was to hand for reference, as there are some common parts from which other bits of the spur geared car may be scaled. The obvious common components are the 3" diameter ED Speedicord Cressite tyres with hubs & bearings, the nicely stamped brass radiator and also the bent alloy front axle. Some repro Speedicord tyres are still available from Bill Bannister of the RRC I believe, but I was incredibly fortunate to get hold of a set of 4 new and unused original tyres and wheels for my car from an old RRC member by virtue of a chance conversation at a Sandown Park Model Engineer Exhibition a couple of years ago.
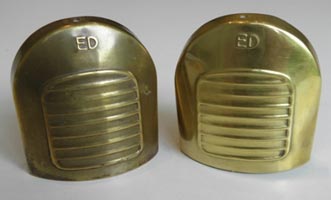
The radiator on Miles’ spur geared car strangely has no "ED" embossed on it like the Aerocar part, nor is it adorned with a turned brass radiator cap, and it has also been cut down by ¼" at the base to reduce its height. This radiator turned out to be the hardest component of all to reproduce. A few years’ search to locate an original Aerocar part and my attempts to tin-bash one from brass sheet over a hardwood dolly both failed, so finally I had to invest in having a lost wax master mould professionally made from my original Aerocar part, and some repros cast in brass.
|
They are externally exact and rather beautiful replicas of the Aerocar part (the image shows the original radiator on the left and a lost wax cast version on the right), though the lost wax process can not deal with compound curves in .020" thick material over such a surface area, so the edges and back had to be thickened up and strengthened somewhat. This is fortunately no bad thing at all, as both the Aerocar and spur geared car could do with some extra weight at the front end to improve balance. |
|
Part II Having got the wheels, front axle and radiator components defined, an original ED Mk 3 engine and matching ED clutch are essential components around which the drive train can be designed and built. I think that to attempt to use any different engine & clutch combination would be a very difficult undertaking indeed, except perhaps an ED Competition Special 2cc engine with its ED clutch which has the same overall length, but this would necessitate the rear, sideport venturi sticking out of the side of the car, so neither such a neat installation nor as authentic.
It took a long time to work out the specific spur gear components to use, but the clue from Model Cars that they were 1.6 to 1 ratio, and from consideration of the geometry and spacing from the engine centre line to the back axle requires a particular set of Muffett gears which must be almost if not exactly the same as those originally used. I ordered 1 each of part SO40 040S and SO40 064S – they cost about £26 incl. VAT and p&p 4 years ago, so will be a bit more now. To use the 1.5 to 1 ratio advertised later, SO40 064S would be replaced with a SO40 060S gear and the axle to engine shaft C/L spacing reduced by 0.050". With the June 1949 MCN ED advertisement mentioning this ratio, perhaps the Hastings Trophy 50.5mph Class C record breaking car had been modified from 1.6 to 1.5 to 1, and/or might also have been the Miles streamlined car entered not very successfully in the 1949 MG Trophy? If it was, this would doubtless have contributed to ED’s lack of momentum to get the 1948 MG Trophy car into production.
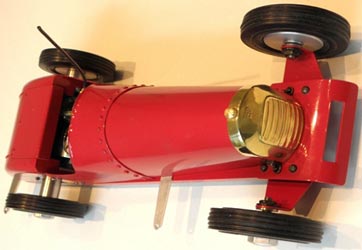
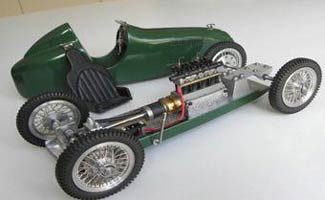
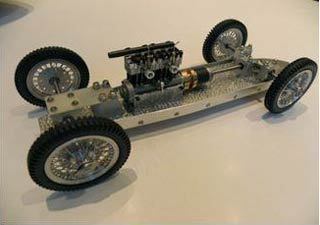
The image below shows the engine/clutch/gear/axle assembly installed in my replica car. There is also a period rotary fuel cut-out fitted using a thin brass strap around it to the upper rear 6BA cylinder flange retaining screw, with a 6" long, rubber tubing covered wire as the knock-off arm.
|
|
The smaller 40 tooth gear is attached to the face of the ED clutch bell with 3 countersunk 6BA steel screws, spotting through the tapped holes on the bell drive face. Now I can’t be sure whether or not Basil Miles did this on the original car, but after some experimentation I made a 1/4" diameter stub shaft to protrude through the end of the clutch bell and gear to engage in a 1/4" id flanged ball bearing precisely mounted in the 1/8" right hand inside dural side frame member to rigidify the engine assembly. Without this, alignment of the engine and engagement of the spur gears is extremely difficult to arrange for smooth operation and is quickly lost when run. |
Could this perhaps be why the spur gear car never really made it into production and the market? Without this extra, very precisely placed ball bearing support Miles would have needed to make constant adjustment to his car to keep it in running fettle, and it would have been a major source of dissatisfaction to kitchen table builders from a kit, so perhaps this is why ED quietly dropped it from their listings and continued with the much simpler Aerocar alone for another few years? As I suspect that Basil’s original spur geared car was cannibalised to make up his quite different looking 1949 streamlined MG Trophy entry, just as his 1948 winning car was built from some cannibalised parts from his early 1948 "Flatiron" car, we shall probably never know for certain. A further possible reason for ED never producing the kit was the fairly complex shape of the body’s cockpit section with its two bumps in the scuttle top, and the scuttle also needed to be riveted or otherwise fastened to the bonnet section.
With the above insights into the design it was possible to scale external design details from the published images, though a few iterations using trial and error were involved, especially during the actual construction of my repro version. The 1/2" square hardwood chassis members turn out not to be straight like the Aerocar parts but have a two section taper from the rear to the front, with internal rebates for the inside 1/8"dural side members. This is not readily apparent from any of the contemporary images available.
 |
 |
 |
Round head (and some csk) 4BA non-plated steel screws are used for much of the assembly with 5/16" square nuts, which are impossible to source these days, so need to be made up in the lathe from 5/16" square mild steel bar. I lightly chemically blackened (more "browned") all fasteners with Metalblak for aged appearance (I don’t use modern plated fasteners, they would not look right…..), and also treated the small brass radiator brackets and bonnet former in this way.
|
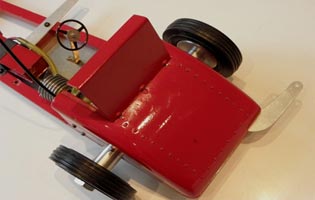
To make up the bonnet/cockpit assembly, a 1/16"x1/4" central brass former was shaped and the two aluminium body sections made from 20swg sheet, which needs to be bent to the correct cross sectional shape to fit inside the radiator rim at the front and over the centre former at the joint position. I made these parts to fit by first preparing cardboard templates carefully cut to fit, then forming the ali sheet by hand over an old rolling pin. The two bumps on the scuttle top were fun, but eventually produced using a hand-held piece of 1/2" diameter steel bar and brute force against a rounded hardwood bench edge. |
|
These two front sections may have been riveted together on the original car, but I used some 8BA round head, slot-less screws from EKP instead, secured to the brass former with thin lock nuts. It looks as if there were 17 of these originally, so that’s how many were used, equally spaced. I have prepared a reasonably detailed description of the full construction and assembly of the model, and anyone who might be interested in having this can contact me at stevebetney@aol.com for a copy by email. I can also supply a copy of my scruffy, faint working drawing if desired if an A5 SAE is sent.
|
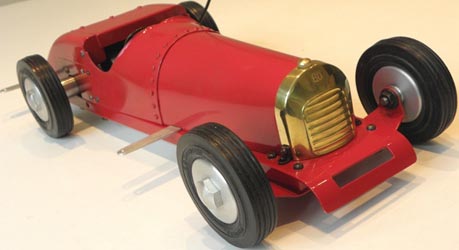
The whole car was finished with sanding sealer, cellulose primer, red cellulose paint (like the original) and gloss fuel proofer. A suitable, period, soldered tin fuel tank was used, secured to the mid chassis cross member with a thin brass strap and 6BA screws, though the original method of mounting is not clear from any of the available magazine images, and it could possibly have been fixed to the underside of the scuttle. I hope that other modellers will find the subject car historically interesting and attractive. I’m very pleased with the authentic appearance of my model, and feel that investment of the hundreds of hours of research and design work that have been involved have been worthwhile to make this unique replica. |
|
1937 OHC AUSTIN 744cc
Model Tethered Car
Back in the 1970s, every time I went to my old friend Mike Beach’s Twickenham home I couldn’t help admiring a little Austin tethered car at about 1/10th scale, which he kept on his sideboard. This model was made by a Mr. Tiller in the 1950s, and I believe Mike bought it directly from him. It was really nicely made; with a home built and designed 6cc twin ohc 4 stroke engine and wire spoke wheels.
|
The car featured on the front cover of the August 1979 Model Mechanics magazine, with a short article about the full size car and scale drawings (plan MM 205) on pages 373/3 with a pair of b/w photos of the model. It must have been about 30 years ago when I noticed to my dismay that it had gone. Mike told me that an American collector had turned up unannounced at his door saying that he had come to buy the car, which he did for a goodly sum after the customary haggling, so off it went to the USA. |
|
I’m not sure who owns it now, but it features proudly in Robert Ames’ wonderful book "Vintage Miniature Racing Cars" as plate 149 with the rather appropriate description; "Perhaps the ultimate homebuilt. An English "Austin Racer" with scratch built 2 cylinder overhead camshaft engine".
I often thought about this car over the years and mentioned this once when I was on one of my weekly visits to Mike in the Hampton nursing home where he spent the last couple of years or so of his life, and he suggested that I should build one of my own. This idea quickly took hold when I realised that the lovely little Profi Micro Engines 2cc in-line 4 cylinder 4 stroke engine was an ideal size to fit a 1/10th scale model, after I got the plans (MM268 & MM 205) from a certain artypole, or R.T.Pole as he was known in non-email days (Peter Hill in old parlance). These little engines really are gems of totally practical miniature engineering, and worth every penny of the large sum of which PME will relieve you to make one for you. They absolutely purr when running!
 |
 |
Having selected the power plant and 1/10th scale size, the hard job as all constructors among you will well know is to find suitable scale tyres. The nearest available after a worldwide search were Meccano 3" diameter tyres for 2" hubs. Not ideal, but if you buy the repro ones, these are cast without the "Meccano" lettering on the sides and just need the moulding flash removing by sanding the tread in the lathe to clean them up. I decided to get my contact Chris Garcia in California to make me up a set of scale spoked 2" wheels to fit, as his work is second to none and I could certainly never approach his standard of craftsmanship on these. They are not only beautiful, but strong and practical as well, as he turns the rims and hubs from hard alloy and uses hardened steel pins for spokes. It may take a year or so to get them made, but it is certainly well worth the wait for heirloom quality items.
 |
 |
The Model Maker MM 268 plan is 1/10th scale and I used the outlines from this along with the sprung, cantilever front suspension to make my model, but my own ideas for the rest of the construction, as can be seen from the accompanying images. The body is carved from very hard balsa wood and coated with a glass epoxy skin before a million coats of nitrocellulose primer & Austin green finish are sprayed. The bevel gears are from Muffets and the steering wheel is a modified Meccano item. I do like cockpits to have an engine-turned panel with instruments, and these are not difficult to make with blackened brass model ships’ portholes of appropriate size with dials from scale model ship/aero instruments. The hardest part was the radiator grille, which I finally made by soldering up the outline and vertical spokes from 1.5mm & 1.0mm brass wire using different melting point solders, with aluminium mesh epoxied to this then the assembly sprayed with Humbrol metallic enamel.
|
|
The Austin badge was made by grabbing an image from the net, reducing it to scale, printing on photo paper and coating with clear acrylic spray for added strength and protection. The louvres are made up from block sandwiches of 1.0mm ply & 1.5mm obechi strip, cyanoed together and set into recesses in the balsa body after this had been skinned with glass epoxy. The whole project probably took a couple of hundred hours or so in all, but think how much longer Mr Tiller must have taken in the 1950s to make his own engine and wire spoked wheels. I take my hat off to him, but I really like my tribute version. |
©copyrightSteveBetney2015
Work Bench welcomes pictures with any relevant information concerning projects and restorations of tethered hydroplanes, cars or engines.
Email: otwmedia0@gmail.com