|
Home Updates Hydros Cars Engines Contacts Links Contact On The Wire |
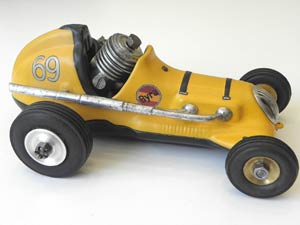
1951 ETA 29 SPARK POWERED CAR RENOVATION PROJECT
Steve Betney
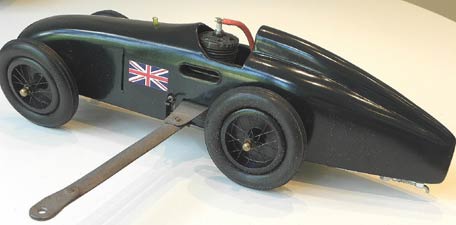
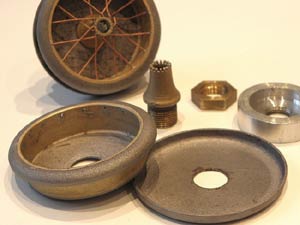
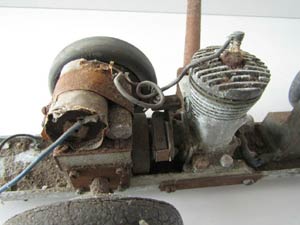
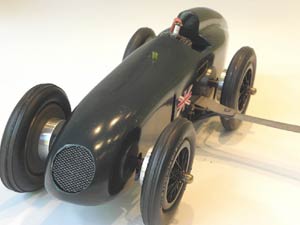
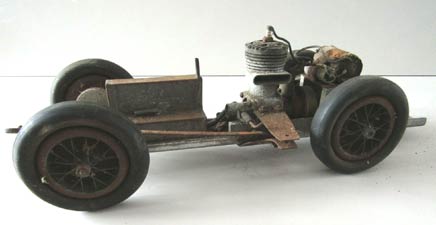
About 9 months ago I bought an irresistible looking (to me) mess of a "Barn find" tethered car project on eBay UK. As you can probably see from the small images below, it was a rather corroded and filthy relic, but with some very interesting features. It has now been renovated and completed to running condition into the rather handsome car above.
 |
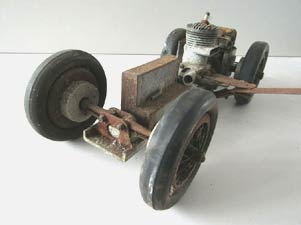 |
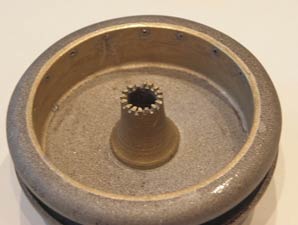
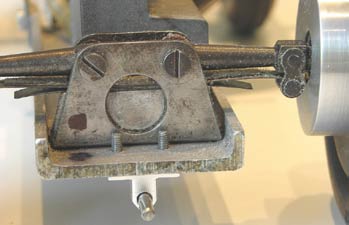
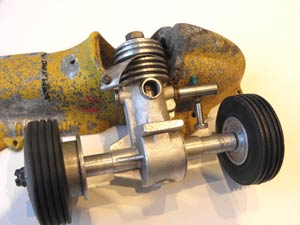
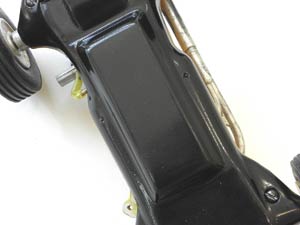
The sturdy 1/8" aluminium U channel chassis plate is unusually long and narrow, measuring 13 ½" long by 1 ¾" wide, and the track is 4 ½" width both front and rear, with a wheelbase of 8 ½". Under all of the rust, muck and rotted tyres it looked like a really interesting and well made piece of work, and so it turned out to be. It was obviously put together by a real craftsman who knew what he was doing, including the spoked wheels and the spark ignition conversion of a 1951 ETA 29 Mk 3 engine serial number 29873, with a custom made front housing, cam, points assembly (with broken spring), ignition coil and flywheel. From the general look of the design and parts I strongly suspect that the car is from the UK around 1951, as it has early 1066 aircored tyres (totally shot) and appropriate period fastener threads etc. Also the small home made coil was wrapped in an Ever Ready U 11 battery label priced 3 1/2d! As there was a missing internal connection to the coil winding it had to be replaced by a small 1950s American coil. The original metal cased condenser was amazingly still working when tested despite having a very corroded case, but it was replaced with a NOS period component for safety. The independently sprung front suspension is quite complex and very well thought out and made, and the 2:1 ratio bevel gear drive works very smoothly after cleaning and oiling and having the corroded axle ball bearings replaced with exact non-shielded period parts. The ignition cut off switch is of an ingenious pattern and mounted under the rear part of the chassis pan and functions very well, but is exposed to track dirt, grit and oil etc. in use in that position.
After the initial disassembly and cleaning off the loose dust, dirt and cobwebs, the surface state of the aluminium U-channel section chassis, rusty fuel tank exterior and other metal parts drove me to invest in a big new silent compressor, a bead blasting gun and 25kg bag of fine glass beads to clean it up. I’ve always needed another big compressor after getting rid of my previous incredibly noisy piston version, and this was a good excuse. It really cleaned up all of the major components a treat, and together with much hand and solvent cleaning of the small and more delicate parts and ETA engine, it has all come up nice and clean and not over-renovated looking, as you may be able to see from some of the later images.
|
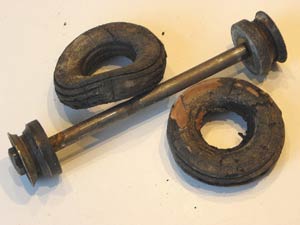
The unusual pattern spoked wheels were a big part of the appeal of the car to me in the first place, but two damaged ones required re-lacing. This was done as it was originally, using 24swg fuse wire silver soldered to the holes in the outer rim of the well-made, turned wheel halves and neat slots in the turned brass hub. They are not load bearing spokes of course, just decorative. This was a very difficult job, and I wound up getting two kinds of lower temperature silver solder to repair the brass hub to inner wheel disc joint and then fix the spokes, to avoid melting the original joints of the outer wheel bead rim to hoop and hoop to centre disc. |
|
|
I have no idea how the original creator of this car managed it, but all of the wheel part joints and the spoke attachment points were done faultlessly in the same high temperature silver solder with incredible precision, I really take my hat off to him for this and nearly all of the other work. I tried chemically blackening the finished wheels but could not achieve an even colour with the different steel, brass, solder and plated fuse wire materials, so ended up having to spray paint them black with a fine protective coat of satin epoxy fuel proofer. I have fitted a set of repro solid rather than aircored Retro Racing Club 1066 Racing Cord tyres so that the car will be runnable.
|
Extensive research of period sources of information, drawings and images of late 1940s to 1950s tethered cars with spoked wheels have turned up no similar type wheel construction and spoke pattern, so just whose hand was it who created these? There were many incredibly skilled toolmaker etc. engineers around at that time, but the expert knowledge to design and fabricate every part of this car including the spark ignition conversion of the ETA 29 engine was not over-common even then, but none of the friendly experts consulted so far have been able to identify him. Is there anyone out there who can help to track down this admirable craftsman? Other unique features such as the unusual springing arrangement for the independent front axles’ suspension and the five part tether arm construction, with the arm itself made from two narrow strips of steel with edges brazed to a semi-streamlined section, might provide clues? |
|
The tether cable attachment point is a good old British standard 9 inches from the car centre line. All of the while that the rolling chassis renovation was progressing, a suitable full size vintage car design to scale down to suit the wheelbase and track, long rear chassis and 1066 tyre diameter dimensions was being researched, and the MG Magic Midget EX 127 from 1933 was finally selected. The Drysdale Press tethered car plan by J Cruickshank of this is a hopelessly unattractive and non-scale model in most respects, and I could find no other drawings, so I worked from period photographs and known dimensions of the original car to produce a body shape which looks right, albeit using some compromise anamorphic scaling license to fit. The long rear chassis plate had to have its corner edges trimmed to fit the MG shape, which I didn’t want to do, but this was unavoidable as no other scale body shape could be found which did not require this, it really does have a long back end. Now, I should say at this late stage that I strongly suspect that the car had never actually been run on a track in anger, for number of reasons: there was no evidence of any fixing for bodywork or battery box for the ignition, and the fuel tank was clean internally. The ETA 29 engine had certainly done some running witnessed by internal condition inspection, and the original Champion spark plug showed signs of usage at the points, possibly just from testing after conversion from glow to spark operation.
 |
 |
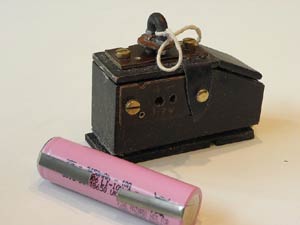
For making up the body, my favourite construction method was used, with ½" thick obechi side sheets, cracked at the rear axle line to form the rear taper, glued to a rock hard balsa centre block, all then band sawn to plan and side elevation profiles. The outside was carved and sanded to the desired cross sections, and given a skin of flexible weave glass cloth and epoxy resin for durability. There was not much room on the tapered rear chassis for an ignition battery, so to squeeze one in it was resorted to using a single Samsung 3.7Volt Lithium Ion cell only 2 ½" long by 5/8" diameter with an amazing 3.45Ah capacity in a small, custom made plywood box using external vintage connectors in order to squeeze one in. This gives a very strong spark at the plug points!
 |
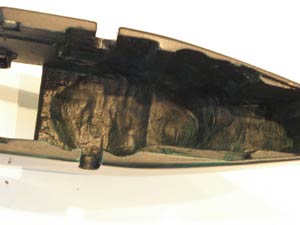 |
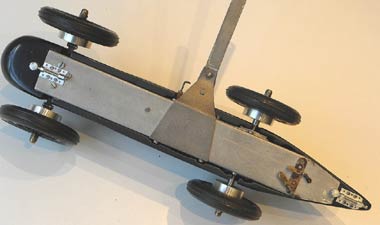
The inside of the body required much careful excavation to fit over the rolling chassis components and multiple cut outs in the sides, as the view here of the inside rear illustrates. A pair of definitely non-vintage RC sliding canopy catches at front and rear secure the body to the chassis. Finish is cellulose sanding sealer, grey cellulose primer, dark BRG cellulose paint and a final thin coat of satin epoxy fuel proofer. The Union Jack decals on both body sides set it off nicely and give it an attractive and convincing vintage appearance. On that note, just a reminder of how it all started:
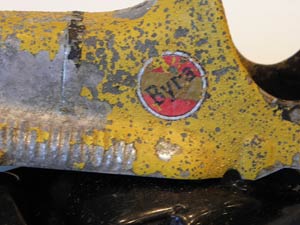
Byra/Cox Champion
The January editorial of
Adrian's
Model Engines was a bumper one, and the piece on Byra engines was of particular
interest to me. I bought a tethered car with a Byra twinshaft engine in it a
couple of years ago, and was in communication with Jesus Ortega Delgado (very
nice chap) at the time to find out some more of the history on it, as I was
previously unaware of Byra's involvement in my favourite modelling aspect of
tethered cars. Apparently, Byra OEM'd some Cox Champion car components into
Spain around 1948 I think, and fitted them with their own 4.5cc twinshaft engine
and drive tyres. The engine I have is exactly the same as the pre-production one
illustrated in the AME article, except that it has a dummy, non-driven second
shaft, unlike the twinshaft engine referred to in the article, which has the
second shaft driven. As can be seen from some of the pics, the car was in pretty
lamentable condition, but the Byra decals were still visible. The engine has
cleaned up to excellent condition, very little used, and amazingly the drive
tyres are also very good and still runnable.
 |
 |
 |
| As found, well worn | Rare Byra 'twinshaft' motor | Front tyres past their best |
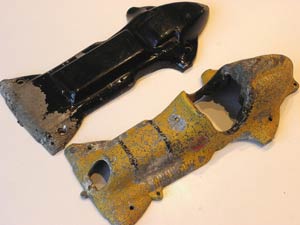
The top car casting is a standard Champion item, as are the fuel tank, dummy exhaust pipe and radiator parts. The bottom chassis pan casting has been specially cast to OEM as plain, without the Cox identification lettering to conceal (?) its origin. It is definitely as cast and not just had the lettering milled off or otherwise removed.
The front axle is 7.0MM diameter steel, with turned brass wheels running directly on it and M7 retaining nuts, so must have been made by Byra, though the (shot to Hell) front tyres look like standard Cox Champion items and I have replaced them with NOS Champion tyres.
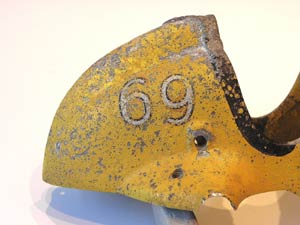
I have
managed to restore the corroded top body part to decent condition and find some
identical yellow cellulose paint to the original, and make up some reproduction
Byra decals, but I have stalled on the final finishing of the decoration in
trying to exactly match the "69" numeral decals, which are silver outlined in
black, but of a very thin character width, totally unlike Cox decals, or any
others I have been able to find. Maybe I'll get round to sorting this out now
that I've got the parts out again from my work in progress pile where they have
been languishing......
 |
 |
| Original decals still in position | |
I just love the look of the little 1cc twinshaft engine also pictured in the article, what a little cutie. If only ED had got round to making a Bee twinshaft it would have been quite successful I reckon, as does my good pal Kevin Richards, who has thoughts of making one up he tells me. Not sure how he will handle the induction on this though. I have an interesting ED Bee front rotary engine which I bought from Germany on eBay years ago. It is a standard Bee Mk 1, fitted with what looks like an early Frog 100 crankshaft with a shortened shaft thread, but interestingly has no hole in the backplate for a venturi tube. It runs like stink, much faster than a standard Bee, so would have been a good way for ED to go on development of this engine.
I've finally got round to finishing off the
renovation of the Byra/Cox Champion car. Matching the unusual outlined font for
the "69" numerals was a rotten task as I have no graphics software for
manipulating outlined numerals or characters or any mates skilled in this to
turn to. I finally found some thin stroke width numerals of 3/4" height on
silver self adhesive decal material after a very long search, and with a bit of
work with my scalpel reshaped the ends of the ascender and descender parts of
the 6 and 9 to match the shape of the Byra decals. These were then adhered to
some micro thin self adhesive vinyl sheet, and painstakingly cut out with a
scalpel to leave a 1mm black outline around the silver, which just about exactly
matches the original, as I hope might be discernible from comparison of the
before and after pics.
 |
 |
 |
| Devoid of any markings | Another super renovation by Steve | |
All in all, it's probably been well worth the considerable time the renovation has taken, and is nice looking and pretty rare piece of Spanish tethered car history I think.
©copyrightStevebetney/OTW2024